
Deploying OSPF requires careful planning and configuration at four levels:
For the OSPF autonomous system (AS), you need to:
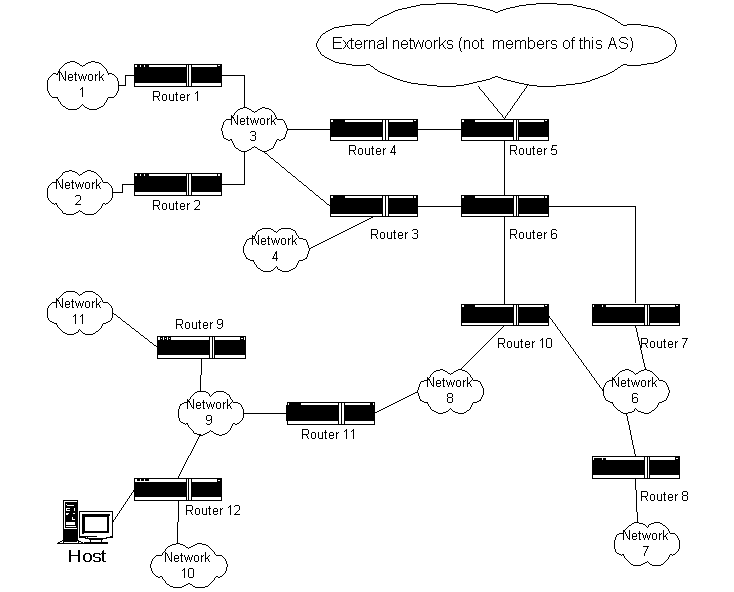
The Figure 1 shows a sample map of an Anonymous System. Router 5 have EGP connection to other Anonymous System. Is it an ASBR.
The Figure 2 shows a sample OSPF area configuration.
The
first area consists of networks N1-N4, along with their attached routers RT1-RT4.
The second area consists of networks N6-N8,
along with their attached routers RT7, RT8, RT10 and RT11.
The third area consists of networks N9-N11 and Host, along with their
attached routers RT9, RT11 and RT12.
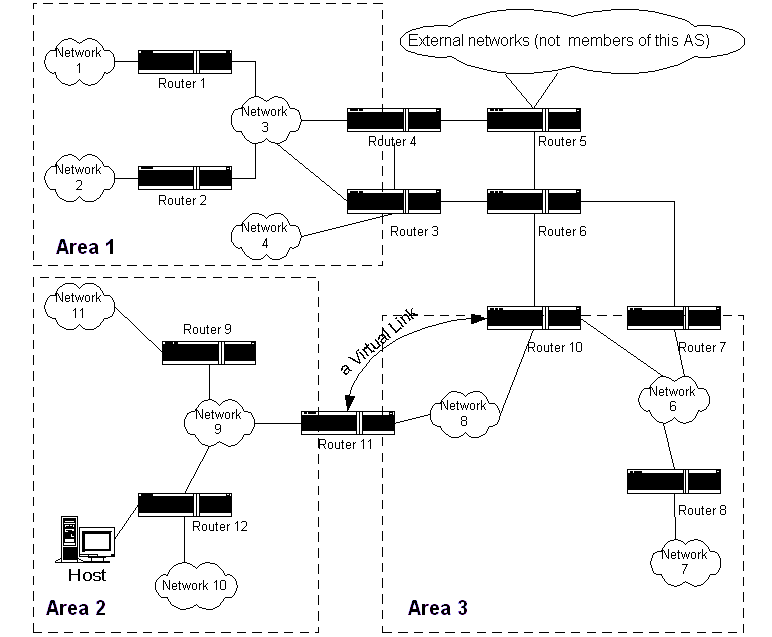
In Figure 2, Routers RT1, RT2, RT5, RT6, RT8, RT9 and RT12
are internal routers.
Routers RT3, RT4, RT7, RT10 and RT11 are area
border routers.
Finally, as before, Router RT5 is AS boundary router.
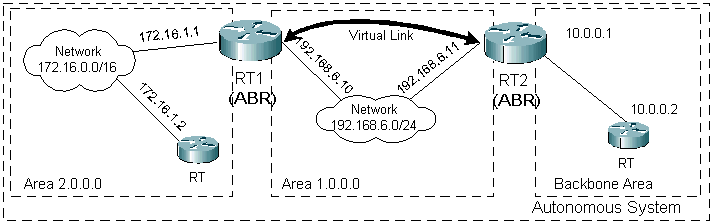
Router RT11 is a backbone router because it belongs to two areas. In order to make the backbone connected, a virtual link has been configured between Routers R10 and R11. Again, Routers RT3, RT4, RT7, RT10 and RT11 are area border routers. As Routers RT3 and RT4 did above, they have condensed the routing information of their attached areas for distribution via the backbone.
The backbone enables the exchange of summary information between area border routers. Every area border router hears the area summaries from all other area border routers. It then forms a picture of the distance to all networks outside of its area by examining the collected advertisements, and adding in the backbone distance to each advertising router.
Note that a failure of the line between Routers RT6 and RT10 will cause the backbone to become disconnected. Configuring a virtual link between Routers RT7 and RT10 will give the backbone more connectivity and more resistance to such failures. Also, a virtual link between RT7 and RT10 would allow a much shorter path between the third area (containing N9) and the router RT7, which is advertising a good route to external network N12.
For each router, you need to:
For each IP address for each router interface that uses OSPF, you need to:
Step 1. Configure and activate OSPF port.
[03:46:13] ABILIS_CPX:d p res:ospf

RES:Ospf ----------------------------------------------------------------------
       DESCR:Open_Shortest_Path_First_Routing_Protocol
       LOG:DS       ACT:YES       max-lsa:200      max-routes:500
       RFC1583COMP:YES            ASBR:NO
Step 2. Configure OSPF area for both routers.
[00:30:23] ABILIS_CPX:d ospf area

--------------------------------------------------------
AREA:               AUTTYPE:   STUB:    DEFCOST:
--------------------------------------------------------
001.000.000.000     NO         NO          65535
--------------------------------------------------------
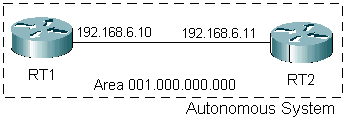
Area configuration on both routers must be equal. If we have different values for AUTYPE or STUB parameters then connecton between this routers will be not established.
Step 3. Configure IP port for use with OSPF protocol.
Screen layout for RT1
[00:41:41] ABILIS_CPX:d p res:ip-1

RES:Ip-1 - IP over LAN (LAN) --------------------------------------------------
       DESCR:192.168.6.10
ACT    OPSTATE:UP
       LANRES:Eth100-1
       IPADD:192.168.006.010                         BRD:NET
       MASK:255.255.255.000   MTU:1500               OUTBUF:50
       NAT:NO                 SRCV:NO                FAIRQUEUE:YES
       REDIS:YES              HIDE:NO                RP:OSPF
       SPEEDLIMIT:NO
       - OSPF section ---------------------------------------------------------
       OAREA:001.000.000.000     ONETTYPE:PP     OPRIO:0      OCOST:1
       ORXMT:5      OTRDEL:1     OHELLO:10       ODEAD:60     omax-nei:5
Screen layout for RT2
[00:41:41] ABILIS_CPX:d p res:ip-1

RES:Ip-1 - IP over LAN (LAN) --------------------------------------------------
       DESCR:192.168.6.11
ACT    OPSTATE:UP
       LANRES:Eth100-1
       IPADD:192.168.006.011                         BRD:NET
       MASK:255.255.255.000   MTU:1500               OUTBUF:50
       NAT:NO                 SRCV:NO                FAIRQUEUE:YES
       REDIS:YES              HIDE:NO                RP:OSPF
       SPEEDLIMIT:NO
       - OSPF section ---------------------------------------------------------
       OAREA:001.000.000.000     ONETTYPE:PP     OPRIO:0      OCOST:1
       ORXMT:5      OTRDEL:1     OHELLO:10       ODEAD:60     omax-nei:5
Allow to use this IP port with OSPF protocol. For this set RP parameter equal OSPF.
Configure ID of OSPF area (OAREA field) and type of network (ONETTYPE field).
Step 4. Configure the other end of Point-to-Point connection.
You must set for each neighbor the next parameters:
Other fields are not used for this type of network and their any values will be ignored.
Screen layout for RT1
[00:41:45] ABILIS_CPX:d ospf neigh

----------------------------------------------------------------
NEIGH:           IP:    PRIO:   POLL:    COST:
----------------------------------------------------------------
192.168.006.011     1       0      30        0
----------------------------------------------------------------
Screen layout for RT2
[00:41:45] ABILIS_CPX:d ospf neigh

----------------------------------------------------------------
NEIGH:           IP:    PRIO:   POLL:    COST:
----------------------------------------------------------------
192.168.006.010     1       0      30        0
----------------------------------------------------------------
Step 5. Save configuration and restart OSPF port.
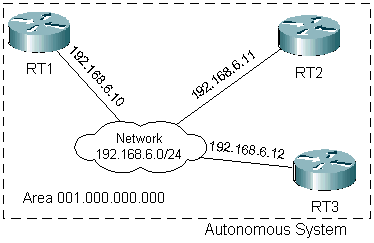
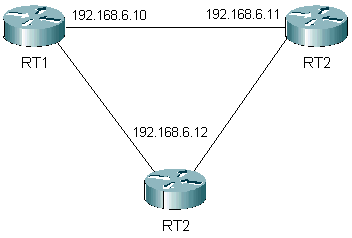
In this example RT1 and RT2 have priority more then 0, it means They can be eligibled to Designated Router (DR) or Backup DR (BDR) for this network. RT3 has priority equal 0 he cannot be DR(BDR).
Step 1. Configure and activate OSPF port.
[03:46:13] ABILIS_CPX:d p res:ospf

RES:Ospf ----------------------------------------------------------------------
       DESCR:Open_Shortest_Path_First_Routing_Protocol
       LOG:DS       ACT:YES       max-lsa:200      max-routes:500
       RFC1583COMP:YES            ASBR:NO
Step 2. Configure OSPF area for all routers.
[00:30:23] ABILIS_CPX:d ospf area

--------------------------------------------------------
AREA:               AUTTYPE:   STUB:    DEFCOST:
--------------------------------------------------------
001.000.000.000     NO         NO          65535
--------------------------------------------------------
Area configuration on all routers must be equal. If we have different values for AUTYPE or STUB parameters then connecton between this routers will be not established.
Step 3. Configure IP port for use with OSPF protocol.
Screen layout for RT1
[03:53:41] ABILIS_CPX:d p res:ip-1

RES:Ip-1 - IP over LAN (LAN) --------------------------------------------------
       DESCR:
ACT    OPSTATE:UP
       LANRES:Eth100-1
       IPADD:192.168.006.010                         BRD:NET
       MASK:255.255.255.000   MTU:1500               OUTBUF:50
       NAT:NO                 SRCV:NO                FAIRQUEUE:YES
       REDIS:YES              HIDE:NO                RP:OSPF
       SPEEDLIMIT:NO
       - OSPF section ---------------------------------------------------------
       OAREA:001.000.000.000     ONETTYPE:NBMA   OPRIO:10     OCOST:1
       ORXMT:5      OTRDEL:1     OHELLO:10       ODEAD:60     omax-nei:5
Screen layout for RT2
[03:53:41] ABILIS_CPX:d p res:ip-1

RES:Ip-1 - IP over LAN (LAN) --------------------------------------------------
       DESCR:
ACT    OPSTATE:UP
       LANRES:Eth100-1
       IPADD:192.168.006.011                         BRD:NET
       MASK:255.255.255.000   MTU:1500               OUTBUF:50
       NAT:NO                 SRCV:NO                FAIRQUEUE:YES
       REDIS:YES              HIDE:NO                RP:OSPF
       SPEEDLIMIT:NO
       - OSPF section ---------------------------------------------------------
       OAREA:001.000.000.000     ONETTYPE:NBMA   OPRIO:10     OCOST:1
       ORXMT:5      OTRDEL:1     OHELLO:10       ODEAD:60     omax-nei:5
Screen layout for RT3
[03:53:41] ABILIS_CPX:d p res:ip-1

RES:Ip-1 - IP over LAN (LAN) --------------------------------------------------
       DESCR:
ACT    OPSTATE:UP
       LANRES:Eth100-1
       IPADD:192.168.006.012                         BRD:NET
       MASK:255.255.255.000   MTU:1500               OUTBUF:50
       NAT:NO                 SRCV:NO                FAIRQUEUE:YES
       REDIS:YES              HIDE:NO                RP:OSPF
       SPEEDLIMIT:NO
       - OSPF section ---------------------------------------------------------
       OAREA:001.000.000.000     ONETTYPE:NBMA   OPRIO:0      OCOST:1
       ORXMT:5      OTRDEL:1     OHELLO:10       ODEAD:60     omax-nei:5
Allow to use this IP port with OSPF protocol (set RP parameter equal OSPF).
Configure ID of OSPF area (OAREA field) and type of network (ONETTYPE field).
Step 4. Configure neighbors for each router.
You must set for each neighbor the next parameters:
Screen layout for RT1
[04:20:16] ABILIS_CPX:d ospf neigh

----------------------------------------------------------------
NEIGH:           IP:    PRIO:   POLL:    COST:
----------------------------------------------------------------
192.168.006.011     1      10      40        0
192.168.006.012     1       0      40        0
----------------------------------------------------------------
Screen layout for RT2
[04:20:16] ABILIS_CPX:d ospf neigh

----------------------------------------------------------------
NEIGH:           IP:    PRIO:   POLL:    COST:
----------------------------------------------------------------
192.168.006.010     1      10      40        0
192.168.006.012     1       0      40        0
----------------------------------------------------------------
Screen layout for RT3
[04:20:16] ABILIS_CPX:d ospf neigh

----------------------------------------------------------------
NEIGH:           IP:    PRIO:   POLL:    COST:
----------------------------------------------------------------
     *** NO OSPF NEIGHBORs DEFINED ***
Step 5. Save configuration and restart OSPF port.
Step 1. Configure and activate OSPF port.
[03:46:13] ABILIS_CPX:d p res:ospf

RES:Ospf ----------------------------------------------------------------------
       DESCR:Open_Shortest_Path_First_Routing_Protocol
       LOG:DS       ACT:YES       max-lsa:200      max-routes:500
       RFC1583COMP:YES            ASBR:NO
Step 2. Configure OSPF area for all routers.
[00:30:23] ABILIS_CPX:d ospf area

--------------------------------------------------------
AREA:               AUTTYPE:   STUB:    DEFCOST:
--------------------------------------------------------
001.000.000.000     NO         NO          65535
--------------------------------------------------------
Area configuration on all routers must be equal. If we have different values for AUTYPE or STUB parameters then connecton between this routers will be not established.
Step 3. Configure IP port for use with OSPF protocol.
Screen layout for RT1
[03:53:41] ABILIS_CPX:d p res:ip-1

RES:Ip-1 - IP over LAN (LAN) --------------------------------------------------
       DESCR:
ACT    OPSTATE:UP
       LANRES:Eth100-1
       IPADD:192.168.006.010                         BRD:NET
       MASK:255.255.255.000   MTU:1500               OUTBUF:50
       NAT:NO                 SRCV:NO                FAIRQUEUE:YES
       REDIS:YES              HIDE:NO                RP:OSPF
       SPEEDLIMIT:NO
       - OSPF section ---------------------------------------------------------
       OAREA:001.000.000.000     ONETTYPE:PMP    OPRIO:0      OCOST:1
       ORXMT:5      OTRDEL:1     OHELLO:10       ODEAD:60     omax-nei:5
Screen layout for RT2
[03:53:41] ABILIS_CPX:d p res:ip-1

RES:Ip-1 - IP over LAN (LAN) --------------------------------------------------
       DESCR:
ACT    OPSTATE:UP
       LANRES:Eth100-1
       IPADD:192.168.006.011                         BRD:NET
       MASK:255.255.255.000   MTU:1500               OUTBUF:50
       NAT:NO                 SRCV:NO                FAIRQUEUE:YES
       REDIS:YES              HIDE:NO                RP:OSPF
       SPEEDLIMIT:NO
       - OSPF section ---------------------------------------------------------
       OAREA:001.000.000.000     ONETTYPE:PMP    OPRIO:0      OCOST:1
       ORXMT:5      OTRDEL:1     OHELLO:10       ODEAD:60     omax-nei:5
Screen layout for RT3
[03:53:41] ABILIS_CPX:d p res:ip-1

RES:Ip-1 - IP over LAN (LAN) --------------------------------------------------
       DESCR:
ACT    OPSTATE:UP
       LANRES:Eth100-1
       IPADD:192.168.006.012                         BRD:NET
       MASK:255.255.255.000   MTU:1500               OUTBUF:50
       NAT:NO                 SRCV:NO                FAIRQUEUE:YES
       REDIS:YES              HIDE:NO                RP:OSPF
       SPEEDLIMIT:NO
       - OSPF section ---------------------------------------------------------
       OAREA:001.000.000.000     ONETTYPE:PMP    OPRIO:0      OCOST:1
       ORXMT:5      OTRDEL:1     OHELLO:10       ODEAD:60     omax-nei:5
Allow to use this IP port with OSPF protocol (set RP parameter equal OSPF)
Configure Area ID (OAREA field) and type of network (ONETTYPE field).
Step 4. Configure neighbors for each router.
You must set for each neighbor the next parameters:
Other fields are not used for this type of network and their any values will be ignored.
Screen layout for RT1
[00:41:45] ABILIS_CPX:d ospf neigh

----------------------------------------------------------------
NEIGH:           IP:    PRIO:   POLL:    COST:
----------------------------------------------------------------
192.168.006.011     1       0      30        10
192.168.006.012     1       0      30        0
----------------------------------------------------------------
Screen layout for RT2
[00:41:45] ABILIS_CPX:d ospf neigh

----------------------------------------------------------------
NEIGH:           IP:    PRIO:   POLL:    COST:
----------------------------------------------------------------
192.168.006.010     1       0      30        0
192.168.006.012     1       0      30        0
----------------------------------------------------------------
Screen layout for RT3
[00:41:45] ABILIS_CPX:d ospf neigh

----------------------------------------------------------------
NEIGH:           IP:    PRIO:   POLL:    COST:
----------------------------------------------------------------
192.168.006.010     1       0      30        11
192.168.006.011     1       0      30        21
----------------------------------------------------------------
Step 5. Save configuration and restart OSPF port.
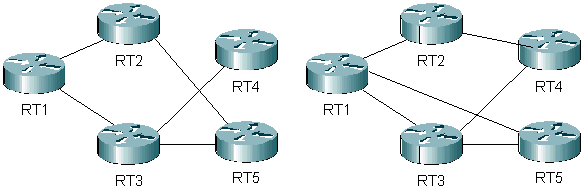
Note. For Point-to-Multipoint you can use different logical topologies,
combine links between as you need. In this case you can reduce OSPF network traffic.
Some variants you can see below.
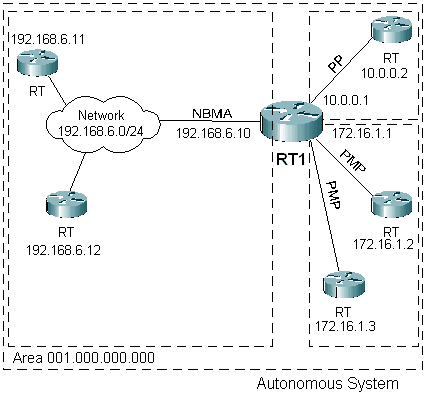
In this example you can see how to configure a router with many interfaces (will show configuration for RT1).
Step 1. Configure and activate OSPF port.
[03:46:13] ABILIS_CPX:d p res:ospf

RES:Ospf ----------------------------------------------------------------------
       DESCR:Open_Shortest_Path_First_Routing_Protocol
       LOG:DS       ACT:YES       max-lsa:200      max-routes:500
       RFC1583COMP:YES            ASBR:NO
Step 2. Configure OSPF area for all routers.
[00:30:23] ABILIS_CPX:d ospf area

--------------------------------------------------------
AREA:               AUTTYPE:   STUB:    DEFCOST:
--------------------------------------------------------
001.000.000.000     NO         NO          65535
--------------------------------------------------------
Area configuration on all routers must be equal. If we have different values for AUTYPE or STUB parameters then connecton between this routers will be not established.
Step 3. Configure IP port for use with OSPF protocol.
Screen layout for RT1. Interface Ip-1
[15:56:53] ABILIS_CPX:d p res:ip-1

RES:Ip-1 - IP over LAN (LAN) --------------------------------------------------
       DESCR:
NEW    OPSTATE:UP
       LANRES:Eth100-1
       IPADD:192.168.006.001                         BRD:NET
       MASK:255.255.255.000   MTU:1500               OUTBUF:50
       NAT:NO                 SRCV:NO                FAIRQUEUE:YES
       REDIS:YES              HIDE:NO                RP:OSPF
       SPEEDLIMIT:NO
       - OSPF section ---------------------------------------------------------
       OAREA:000.000.000.000     ONETTYPE:NBMA   OPRIO:10     OCOST:3
       ORXMT:5      OTRDEL:1     OHELLO:10       ODEAD:60     omax-nei:5
Interface Ip-2
[15:58:04] ABILIS_CPX:d p res:ip-2

RES:Ip-2 - IP over LAN (LAN) --------------------------------------------------
       DESCR:
NEW    OPSTATE:UP
       LANRES:Eth100-2
       IPADD:172.016.001.001                         BRD:NET
       MASK:255.255.000.000   MTU:1500               OUTBUF:50
       NAT:NO                 SRCV:NO                FAIRQUEUE:YES
       REDIS:YES              HIDE:NO                RP:OSPF
       SPEEDLIMIT:NO
       - OSPF section ---------------------------------------------------------
       OAREA:000.000.000.000     ONETTYPE:PMP    OPRIO:0      OCOST:1
       ORXMT:5      OTRDEL:1     OHELLO:10       ODEAD:60     omax-nei:5
Interface Ip-3
[15:59:35] ABILIS_CPX:d p res:ip-3

RES:Ip-3 - IP over LAN (LAN) --------------------------------------------------
       DESCR:
NEW    OPSTATE:UP
       LANRES:Eth100-3
       IPADD:010.000.000.001                         BRD:NET
       MASK:255.000.000.000   MTU:1500               OUTBUF:50
       NAT:NO                 SRCV:NO                FAIRQUEUE:YES
       REDIS:YES              HIDE:NO                RP:OSPF
       SPEEDLIMIT:NO
       - OSPF section ---------------------------------------------------------
       OAREA:000.000.000.000     ONETTYPE:PP     OPRIO:0      OCOST:1
       ORXMT:5      OTRDEL:1     OHELLO:10       ODEAD:60     omax-nei:5
Step 4. Neighbor's configuration for RT1.
[16:01:31] ABILIS_CPX:d ospf neigh

----------------------------------------------------------------
NEIGH:           IP:    PRIO:   POLL:    COST:
----------------------------------------------------------------
010.000.000.002     3       0      40        0
172.016.001.002     2       0      40       13
172.016.001.003     2       0      40        0
192.168.006.011     1      10      40        0
192.168.006.012     1       0      40        0
----------------------------------------------------------------
Step 5. Save configuration and restart OSPF port.
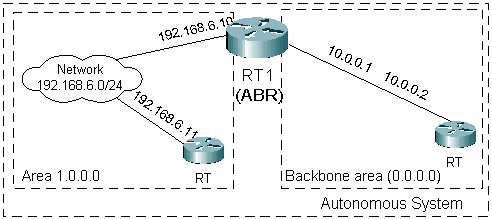
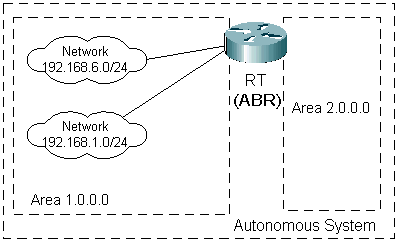
In this example you can see how to configure a router that is connected to many areas. This router is called Area Border Router (ABR).
Step 1. Configure and activate OSPF port.
[04:39:14] ABILIS_CPX:d p res:ospf

RES:Ospf ----------------------------------------------------------------------
       DESCR:Open_Shortest_Path_First_Routing_Protocol
       LOG:DS       ACT:YES       max-lsa:200      max-routes:500
       RFC1583COMP:YES            ASBR:NO
Step 2. Configure OSPF area for this routers.
[04:42:19] ABILIS_CPX:d ospf area

--------------------------------------------------------
AREA:               AUTTYPE:   STUB:    DEFCOST:
--------------------------------------------------------
000.000.000.000     NO         NO          65535
001.000.000.000     NO         NO          65535
--------------------------------------------------------
Area configuration on all routers that are located in one area must be equal. If we have different values for AUTYPE or STUB parameters then connecton between this routers will be not established.
Step 3. Configure IP port for use with OSPF protocol.
Screen layout for RT1. Interface Ip-1
[04:39:21] ABILIS_CPX:d p res:ip-1

RES:Ip-1 - IP over LAN (LAN) --------------------------------------------------
       DESCR:
ACT    OPSTATE:UP
       LANRES:Eth100-1
       IPADD:192.168.006.010                         BRD:NET
       MASK:255.255.255.000   MTU:1500               OUTBUF:50
       NAT:NO                 SRCV:NO                FAIRQUEUE:YES
       REDIS:YES              HIDE:NO                RP:OSPF
       SPEEDLIMIT:NO
       - OSPF section ---------------------------------------------------------
       OAREA:001.000.000.000     ONETTYPE:NBMA   OPRIO:10     OCOST:3
       ORXMT:5      OTRDEL:1     OHELLO:10       ODEAD:60     omax-nei:5
Screen layout for RT1. Interface Ip-2
[04:39:28] ABILIS_CPX:d p res:ip-2

RES:Ip-2 - IP over LAN (LAN) --------------------------------------------------
       DESCR:
ACT    OPSTATE:UP
       LANRES:Eth100-2
       IPADD:172.016.001.001                         BRD:NET
       MASK:255.255.000.000   MTU:1500               OUTBUF:50
       NAT:NO                 SRCV:NO                FAIRQUEUE:YES
       REDIS:YES              HIDE:NO                RP:OSPF
       SPEEDLIMIT:NO
       - OSPF section ---------------------------------------------------------
       OAREA:000.000.000.000     ONETTYPE:PP     OPRIO:0      OCOST:1
       ORXMT:5      OTRDEL:1     OHELLO:10       ODEAD:60     omax-nei:5
Step 4. Configure neighbors for this router.
[04:43:27] ABILIS_CPX:d ospf neigh

----------------------------------------------------------------
NEIGH:           IP:    PRIO:   POLL:    COST:
----------------------------------------------------------------
010.000.000.002     2       0      40        0
192.168.006.011     1       0      40        0
----------------------------------------------------------------
Step 5. Save configuration and restart OSPF port.
In this example you can see how to configure a virtual link between routers RT1 and RT2.
The first will show a configuration process for RT1 the second a configuration process for RT2.
Step 1. Configure and activate OSPF port.
[11:12:26] ABILIS_CPX:d p res:ospf

RES:Ospf ----------------------------------------------------------------------
       DESCR:Open_Shortest_Path_First_Routing_Protocol
       LOG:DS       ACT:YES       max-lsa:200      max-routes:500
       RFC1583COMP:YES            ASBR:NO
Step 2. Set router ID.
[11:15:14] ABILIS_CPX: d p res:iprtr

RES:Iprtr ---------------------------------------------------------------------
       DESCR:IP_Router_general_properties
       - General --------------------------------------------------------------
       LOG:NO                 R-ID:001.000.000.000          NAT:NO
       maxroute:500           DFTTTL:64              ps:2048
       DEF-LOCAL-AD:0     DEF-STATIC-AD:1     DEF-OSPF-AD:110   DEF-RIP-AD:120
       - IP Access List -------------------------------------------------------
       ACL:NO                 ACLBYPASS:#
       COS:DISABLED           COSDFT:NORMAL
       COSBALANCE:NO          NORMRATE:50            LOWRATE:50
       - IP Trace -------------------------------------------------------------
       tracerec:100
       - Ppp-Dns --------------------------------------------------------------
       PPP-DNS-PRI:000.000.000.000  PPP-DNS-SEC:000.000.000.000
Step 3. Configure OSPF areas for this router.
[11:15:20] ABILIS_CPX:d ospf area

--------------------------------------------------------
AREA:               AUTTYPE:   STUB:    DEFCOST:
--------------------------------------------------------
001.000.000.000     NO         NO          65535
002.000.000.000     NO         NO          65535
--------------------------------------------------------
Area configuration on all routers that are located in one area must be equal. If we have different values for AUTYPE or STUB parameters then connecton between this routers will be not established.
Step 4. Configure IP ports for use with OSPF protocol.
Screen layout for interface Ip-1
[11:16:36] ABILIS_CPX:d p res:ip-1

RES:Ip-1 - IP over LAN (LAN) --------------------------------------------------
       DESCR:
NEW    OPSTATE:UP
       LANRES:Eth100-1
       IPADD:172.016.001.001                         BRD:NET
       MASK:255.255.000.000   MTU:1500               OUTBUF:50
       NAT:NO                 SRCV:NO                FAIRQUEUE:YES
       REDIS:YES              HIDE:NO                RP:OSPF
       SPEEDLIMIT:NO
       - OSPF section ---------------------------------------------------------
       OAREA:002.000.000.000     ONETTYPE:NBMA   OPRIO:0      OCOST:3
       ORXMT:5      OTRDEL:1     OHELLO:10       ODEAD:60     omax-nei:5
Screen layout for interface Ip-2
[11:19:10] ABILIS_CPX:d p res:ip-2

RES:Ip-2 - IP over LAN (LAN) --------------------------------------------------
       DESCR:
NEW    OPSTATE:UP
       LANRES:Eth100-2
       IPADD:192.168.006.010                         BRD:NET
       MASK:255.255.255.000   MTU:1500               OUTBUF:50
       NAT:NO                 SRCV:NO                FAIRQUEUE:YES
       REDIS:YES              HIDE:NO                RP:OSPF
       SPEEDLIMIT:NO
       - OSPF section ---------------------------------------------------------
       OAREA:001.000.000.000     ONETTYPE:NBMA   OPRIO:0      OCOST:1
       ORXMT:5      OTRDEL:1     OHELLO:10       ODEAD:60     omax-nei:5
Step 5. Configure neighbors for this router.
[11:20:08] ABILIS_CPX:d ospf neigh

----------------------------------------------------------------
NEIGH:           IP:    PRIO:   POLL:    COST:
----------------------------------------------------------------
172.016.001.002     1      10      40        0
192.168.006.011     2      10      40        0
----------------------------------------------------------------
Step 6. Configure virtual links for this router.
[11:37:54] ABILIS_CPX:d ospf VL

-------------------------------------------------------------------------------
REM-RID:         AREA:           HELLO: RXMT: TRDEL: DEAD:  PWD:         KEYID:
                                                            MD5KEY:
-------------------------------------------------------------------------------
002.000.000.000  001.000.000.000     10     5      2    60                    0

-------------------------------------------------------------------------------
Step 7. Save configuration and restart OSPF port.
Step 1. Configure and activate OSPF port.
[11:28:50] ABILIS_CPX:d p res:ospf

RES:Ospf ----------------------------------------------------------------------
       DESCR:Open_Shortest_Path_First_Routing_Protocol
       LOG:DS       ACT:YES       max-lsa:200      max-routes:500
       RFC1583COMP:YES            ASBR:NO
Step 2. Set router ID.
[11:28:56] ABILIS_CPX:d p res:iprtr

RES:Iprtr ---------------------------------------------------------------------
       DESCR:IP_Router_general_properties
       - General --------------------------------------------------------------
       LOG:NO                 R-ID:002.000.000.000          NAT:NO
       maxroute:500           DFTTTL:64              ps:2048
       DEF-LOCAL-AD:0     DEF-STATIC-AD:1     DEF-OSPF-AD:110   DEF-RIP-AD:120
       - IP Access List -------------------------------------------------------
       ACL:NO                 ACLBYPASS:#
       COS:DISABLED           COSDFT:NORMAL
       COSBALANCE:NO          NORMRATE:50            LOWRATE:50
       - IP Trace -------------------------------------------------------------
       tracerec:100
       - Ppp-Dns --------------------------------------------------------------
       PPP-DNS-PRI:000.000.000.000  PPP-DNS-SEC:000.000.000.000
Step 3. Configure OSPF areas for router.
[11:29:39] ABILIS_CPX:d ospf area

--------------------------------------------------------
AREA:               AUTTYPE:   STUB:    DEFCOST:
--------------------------------------------------------
000.000.000.000     NO         NO          65535
001.000.000.000     NO         NO          65535
--------------------------------------------------------
Area configuration on all routers that are located in one area must be equal. If we have different values for AUTYPE or STUB parameters then connecton between this routers will be not established.
Step 4. Configure IP ports for use with OSPF protocol.
Screen layout for interface Ip-1
[11:30:12] ABILIS_CPX:d p res:ip-1

RES:Ip-1 - IP over LAN (LAN) --------------------------------------------------
       DESCR:
NEW    OPSTATE:UP
       LANRES:Eth100-1
       IPADD:010.000.000.001                         BRD:NET
       MASK:255.000.000.000   MTU:1500               OUTBUF:50
       NAT:NO                 SRCV:NO                FAIRQUEUE:YES
       REDIS:YES              HIDE:NO                RP:OSPF
       SPEEDLIMIT:NO
       - OSPF section ---------------------------------------------------------
       OAREA:000.000.000.000     ONETTYPE:PP     OPRIO:0      OCOST:3
       ORXMT:5      OTRDEL:1     OHELLO:10       ODEAD:60     omax-nei:5
Screen layout for interface Ip-2
[11:30:41] ABILIS_CPX:d p res:ip-2

RES:Ip-2 - IP over LAN (LAN) --------------------------------------------------
       DESCR:
NEW    OPSTATE:UP
       LANRES:Eth100-2
       IPADD:192.168.006.011                         BRD:NET
       MASK:255.255.255.000   MTU:1500               OUTBUF:50
       NAT:NO                 SRCV:NO                FAIRQUEUE:YES
       REDIS:YES              HIDE:NO                RP:OSPF
       SPEEDLIMIT:NO
       - OSPF section ---------------------------------------------------------
       OAREA:001.000.000.000     ONETTYPE:NBMA   OPRIO:10     OCOST:1
       ORXMT:5      OTRDEL:1     OHELLO:10       ODEAD:60     omax-nei:5
Step 5. Configure neighbors for this router.
[11:31:12] ABILIS_CPX:d ospf neigh

----------------------------------------------------------------
NEIGH:           IP:    PRIO:   POLL:    COST:
----------------------------------------------------------------
010.000.000.002     1      10      40        0
192.168.006.010     2       0      40        0
----------------------------------------------------------------
Step 6. Configure virtual links for this router.
[11:36:43] ABILIS_CPX:d ospf  VL

-------------------------------------------------------------------------------
REM-RID:         AREA:           HELLO: RXMT: TRDEL: DEAD:  PWD:         KEYID:
                                                            MD5KEY:
-------------------------------------------------------------------------------
001.000.000.000  001.000.000.000     10     5      2    60                    0

-------------------------------------------------------------------------------
Step 7. Save configuration and restart OSPF port.
Route summarization is the consolidation of advertised addresses. This feature causes a single summary route to be advertised to other areas by an ABR. In OSPF, an ABR will advertise networks in one area into another area. If the network numbers in an area are assigned in a way such that they are contiguous, you can configure the ABR to advertise a summary route that covers all the indivindual networks within the area that fall into the specified range.
There we will not show configuration procedure for all components are needed for OSPF (IP ports, OSPF port, neighbors, etc.) You can see it in any previous example.
Call you attention to OSPF areas configuration and address ranges configuration
OSPF areas' configuration for this router.
[13:48:52] ABILIS_CPX:d ospf area

--------------------------------------------------------
AREA:               AUTTYPE:   STUB:    DEFCOST:
--------------------------------------------------------
001.000.000.000     NO         NO          65535
002.000.000.000     NO         NO          65535
--------------------------------------------------------
OSPF address range configuration for this router.
[13:48:56] ABILIS_CPX:d ospf range

---------------------------------------------------------
AREA:               RANGE:                ADV:
---------------------------------------------------------
001.000.000.000     192.168.000.000/16    YES
---------------------------------------------------------
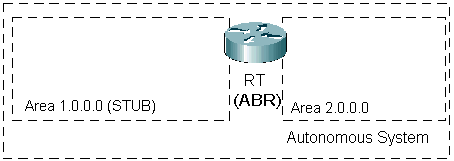
Stub areas are areas into which information on external routes is not sent. Instead, there is a default external route generated by the area border router, into the stub area for destination outside the autonomous system. The cost of a default route depends on value of DEFCOST filed.
There we will not show configuration procedure for all components are needed for OSPF (IP ports, OSPF port, neighbors, etc.) You can see it in any previous example.
Call you attention to OSPF areas configuration.
OSPF areas' configuration for this router.
[12:24:44] ABILIS_CPX:d ospf area

--------------------------------------------------------
AREA:               AUTTYPE:   STUB:    DEFCOST:
--------------------------------------------------------
001.000.000.000     NO         YES            15
002.000.000.000     NO         NO          65535
--------------------------------------------------------
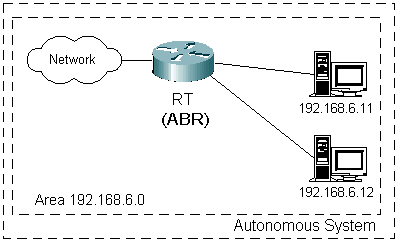
Hosts there are computers directly connected to a router.
There we will not show configuration procedure for all components are needed for OSPF (IP ports, OSPF port, neighbors, etc.) You can see it in any previous example.
Call you attention to OSPF host configuration.
OSPF areas' configuration for this router.
[15:22:21] ABILIS_CPX:d ospf area

--------------------------------------------------------
AREA:               AUTTYPE:   STUB:    DEFCOST:
--------------------------------------------------------
192.168.006.000     NO         NO          65535
--------------------------------------------------------
OSPF hosts' configuration for this router.
[15:19:35] ABILIS_CPX:d ospf host

---------------------------------------
HOST:            AREA:            COST:
---------------------------------------
192.168.006.011  192.168.006.000     10
---------------------------------------
192.168.006.012  192.168.006.000      7
---------------------------------------
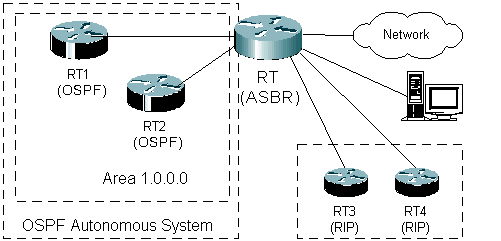
The normally situation is when we have used more as one routing protocols in our networks.
It can be static routing, RIP, OSPF or any other IGP protocol.
For a correct work such networks we must have
the possible to redistribute routes from one routing protocol to any other.
It means that routes were detected through RIP or static protocols
must be known in OSPF Autonomous System and routes were detected through OSPF protocol
must be known on all routes that use RIP protocol.
CPX allow to redistribute OSPF routes into common routes' table and redistribute local, static, RIP routes from common routes' table to OSPF AS.
Step 1. Configure and activate OSPF port.
Select types of route thhat we want to redistribute into OSPF. If need you can set a separate cost (metric) for each type of routes. In Other case will be used default metric (DEF_METRIC field).
[[16:14:50] ABILIS_CPX:d p res:ospf

RES:Ospf ----------------------------------------------------------------------
       DESCR:Open_Shortest_Path_First_Routing_Protocol
       LOG:DS       ACT:YES       max-lsa:200      max-routes:500
       RFC1583COMP:YES            ASBR:YES
       - ASBR section ---------------------------------------------------------
       LOCAL:YES           STATIC:YES           RIP:YES
       LOCAL-METRIC:*      STATIC-METRIC:3      RIP-METRIC:*
       DEF-METRIC:1
Step 2. If need, Define address ranges for routes that will be redistributed into OSPF AS.
You can define a separate metric for each address range. In other case will be used the metric that was defined for this type of route in OSPF port configuration (fields LOCAL-METRIC,STATIC-METRIC,RIP-METRIC).
[16:22:32] ABILIS_CPX:d ospf external

-----------------------------------------------------
EXTERNAL:            PROT:   ACTION:   METRIC:  TYPE:
-----------------------------------------------------
192.168.006.011/32   STATIC  IGNORE        255      1
192.168.006.000/24   ANY     ACCEPT          2      1
010.000.000.000/8    RIP     ACCEPT        255      1
-----------------------------------------------------